Ultimate Guide to Building a Cedar Deck
Whether during summer or any other period, lounging outdoors comes with a therapeutic feeling. Sitting on a reclining chair on your deck and watching your neighborhood in the evening is a great way to relax your nerves after a tiring day.
Having a cedar deck installed outside your home creates a sense of opulence and fulfillment. Besides the fact that a cedar deck is beautiful, it also improves your home’s resale value – just in case you plan on selling.
Here’s the thing; if you wish to install a cedar deck, you can either call the experts or do it yourself. This guide is here to show you how to build a cedar deck. All you need are basic tools, cedar wood, and functional knowledge of decking woodwork.
Types of Cedar Wood for Building a Deck
Cedarwood is an excellent choice for building a home deck. In fact, cedar has a long and rich history in the woodwork industry, and it’s all thanks to its durability, beauty, and aromatic properties that strongly repel rot and insects. Cedar wood is effortless to work with, and there are different types you can use to build your deck.
Although there are at least five types of cedar wood, there are three major options for building a deck.
· Western Red Cedar
This is the popular choice for building a deck. It’s stronger and much more resistant to rot than Eastern cedars. The wood is resistant to shrinkage, easily maintains its straightness, and has a coarse texture that adds to its durability. It often has a fine reddish brown exterior which is perfect for summer evenings.
· Eastern White Cedar
It’s a lightweight, slightly soft, and durable wood. It’s naturally resistant to rot and insect infestation and has a uniform texture that makes it easy to work with. It holds nails firmly and is well suited for coating stains and glue. It’s mostly light brown which turns reddish from exposure. Although it’s not as common as the Western Red Cedar, it’s an excellent choice for decking.
· Atlantic Cedar
The Atlantic Cedar is known for its aromatic odor and bitter taste. It’s a lightweight, straight, moderately soft cedar wood type. It has a characteristic light brown or slightly white color and has a fine texture. Although it’s resistant to rot, it has low shock resistance and is a bit weak in bending. It finishes smoothly and holds paint well.
How To Build a Deck
Building a deck requires money, resources, and planning. Though you might have a personal cedar wood preference and a design in mind, your budget determines the deck you’ll have. Once you have your budget sorted, here’s what you need to do:
1. Design and Planning
Every DIY project starts with a plan! Even if you have an idea of what you want, it’s better to draw out your plan. First, you’ll need to sketch the deck you have in mind. You can also browse through cedar deck designs online for inspiration.
Once you have your sketch or design, map out the best location for your deck. If it’s a deck on the front side of your home, you might not need to build a large deck compared to a backdoor plan. It helps if you know what you will primarily use your deck for. You might not need a large deck if you’re only interested in lounging on the deck occasionally. But, if your deck would be a major spot for outdoor activities like parties, outdoor cooking, or prominent family hangouts, you’ll need to build something big and strong enough to support a crowd. Your deck design should cover essential issues such as vertical and horizontal supports, ledgers, joists, railings, and steps. All this has to go into your planning and design.
2. Permits & Regulations
Before you begin construction on your property, you should always check with your local government agency. They will let you know about the permits and inspections (if any)that are required before you can commence construction. Study the local building codes and know what kind of materials are accepted as standard.
3. Getting your Equipment
Now that you know the rules and what to look for, you will need to source the correct tools and equipment. Always buy from a trusted source to get only the best quality. It is better to buy extra materials, as you do not want to come up short and be unable to complete your new cedar deck construction. You can also speak with a professional contractor; they will know the right materials and quantity to order. Some of the basic materials you will need to construct your new cedar deck include wood screws, drill, circular saw, hand saw, hammer, tape measure, pencil, level, and of course, high-quality cedar timber.
4. Preparation
Armed with your building equipment, it is time to remove your existing decking if you have one. Inspect the structure underneath to know if it will be able to support your new cedar deck. Make sure it is strong enough and conforms to your local building codes. When removing your old decking, be careful not to destroy the existing waterproofing of your house. If you find it difficult to remove the boards, you can cut them into smaller pieces, so they come off easily. When prying off the existing decking, you can use a piece of trim to prevent the pry bar from leaving scuff marks on your siding. After removing the former decking, fill up the holes in your wall with a latex wall/door sealant to keep your waterproofing intact and prevent water damage.
5. Installing your Frame
After preparing your house and structure for your new cedar deck, you need to build the frame that will serve as the foundation for your new deck. You should make appropriate and accurate measurements to make your foundation nice and strong. To frame your deck, use 2 x 4-inch boards for perpendicular joist beams, 2 x 6-inch boards for your cross beams, and 4 x 6-inch boards for your supporting beams. Position your joist beams about 16 inches apart to make your deck solid and prevent vibration/shaking when walking on top of it. Of course, your joist span can vary depending on the size of your joists, the length of your deck, and the local building codes. Note that the larger the joist span, the larger the joists. Whatever joist span you decide to use, make sure you are consistent to make it visually appealing.
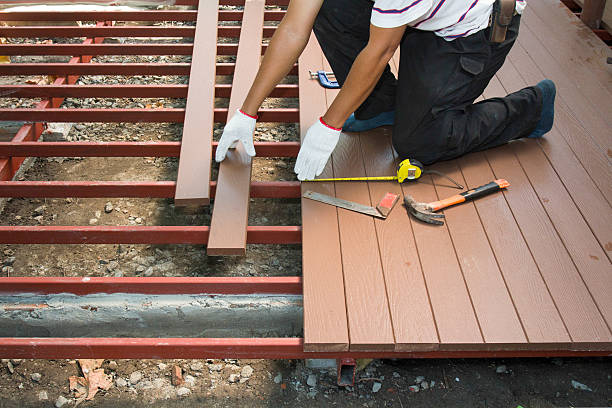
6. Lay Your Decking
Install your cedar deck boards on your frame. You can use stainless steel screws, flat-headed deck screws, or any other stainless steel fastener when installing your boards. Ensure that whatever form of fastener you use conforms to your local building codes. Straight galvanized nails are not advisable because they are prone to corrosion and unsuitable for long-term use. Once you are done constructing your new cedar deck, you should apply a sealant as soon as possible. This will increase your deck’s lifespan and ensure you get the most out of it.
7. Accessorize
You can build stairs or install deck railings if your deck is higher than a step. Deck railings will prevent falls and contribute to general aesthetics by serving as a form of décor. If you want to, you can also build privacy screens, deck covers, planter boxes, etc., to make your new cedar deck look beautiful.
Remember that decks are of different types and serve multipurpose functions, so you have to consider what purpose you are building your deck for.
Luckily, cedar is naturally resistant to decay, so you don’t have to worry about extreme weather conditions.
8. Get Started
Check online for cedar deck inspiration and ideas and purchase cedar materials from a reliable source like Longhouse Forest Products. You can choose between our Yellow or Western Red cedar. No matter how complex your decking project is, we have just the suitable prefinished and custom-cut cedar decking.
With our extensive knowledge and years of experience, Longhouse Forest Products will provide you with the best cedar materials you can find anywhere. Longhouse is tested and trusted by the residents of Vancouver Island. In fact, the Vancouver Construction Association (VICA) has named us ‘Manufacturer/Supplier of the Year twice a row! Contact us at 1-800-811-2010 or email info@longhousecedar.com to place an order and learn more about our products and services.